
Dryer Vent Repair vs Cleaning: Which Do You Need?
Slow drying, a hot laundry room, lint where it should not be — nearly every dryer vent problem announces itself the same way, but the fix splits in two very different directions. Lint buildup inside a sound duct calls for a cleaning. A duct that is crushed behind the dryer, separated inside a joist bay, or built from the wrong material calls for repair or replacement, and no amount of brushing changes that. Pay for the wrong one and the symptom comes right back. Here is how to read the signs, what materials residential code actually allows, and how a video inspection settles the question before you spend anything.
What Is the Difference Between a Clogged Vent and a Broken One?
A clog is a buildup problem inside an intact pipe; a break is a failure of the pipe itself. Lint escapes the lint screen on every load and settles wherever the airstream slows — elbows, long horizontal stretches, the exterior termination — until the duct's open diameter shrinks and moist air can no longer leave the house fast enough. The pipe is fine; its capacity is not. Cleaning restores it completely.
A break is different in kind. The flexible transition duct behind the dryer gets flattened when the machine is shoved against the wall. A joint inside a ceiling lets go and dumps warm, wet, lint-loaded air into the framing. A foil "slinky" duct sags, kinks, or tears at its ridges. An exterior flap rusts shut or snaps off. In each case the exhaust path is physically compromised, and a brush cannot un-crush, reconnect, or rebuild anything. The frustrating part is that both problems produce the same headline symptom — clothes that take too long to dry — which is why so many homeowners pay for the wrong fix first. The secondary symptoms are where the two diverge, so that is where to look.
Which Symptoms Point to a Clog?
Clogs announce themselves gradually, because lint accumulates load by load over months. If the story of your dryer is "it slowly got worse," you are almost certainly looking at buildup, and a professional dryer vent cleaning is the fix. The classic signs:
- Dry times crept up over months rather than changing overnight.
- Lint is visible at the exterior flap or matted across a screen on the cap.
- The dryer top and the finished clothes run hotter than they used to.
- A faint burning-lint smell shows up during long loads.
- The exterior flap barely lifts while the dryer runs.
- Emptying the lint screen helps briefly, then dry times slide back down.
That pattern — gradual onset, extra heat, visible lint — is what a restricted-but-intact line looks like. Our article on why clothes take two cycles to dry walks through the airflow mechanics behind it in detail.
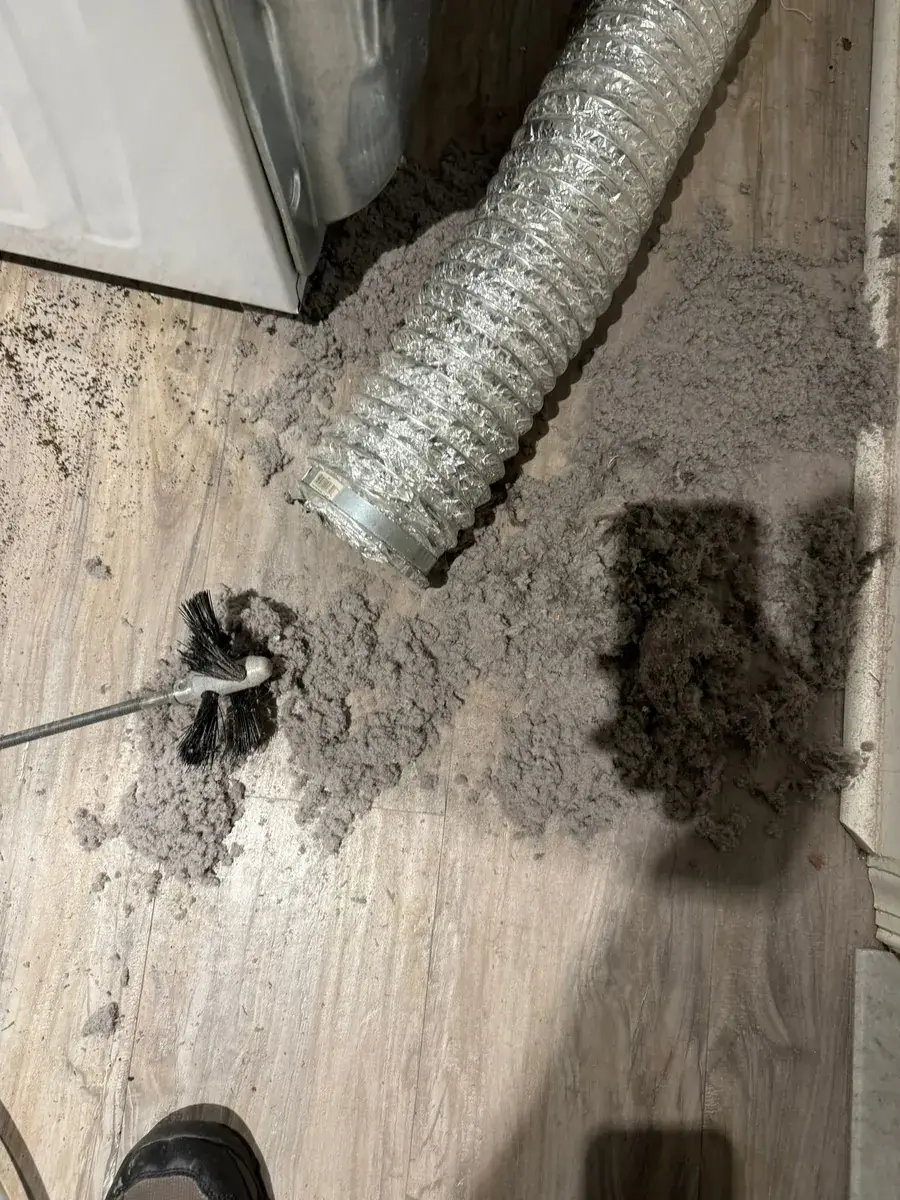
What a real clog looks like
This is lint pulled from a single residential line — this is what "my clothes dry slower lately" looks like once a camera and vacuum get into the duct. Buildup like this rarely sits in one plug; it coats the full length of the run and concentrates at every elbow and at the termination.
The good news about clogs is that they are completely reversible. Rotary agitation breaks the mat loose, vacuum extraction pulls it out of the system, and the duct's full diameter comes back. When the pipe itself is sound, cleaning is the entire fix — dry times return to normal on the very next load.
Which Symptoms Point to a Broken, Disconnected, or Crushed Duct?
Damage announces itself suddenly, or in the wrong place. Where a clog builds slowly inside the line, a break changes things overnight — or sends exhaust somewhere you can see and smell it. Watch for these:
- Slow drying started abruptly, often right after the dryer was moved, serviced, or replaced.
- Lint dust or moisture appears indoors — behind the dryer, on a basement ceiling, in a crawlspace or garage.
- The laundry room turns musty and humid, or condensation forms on nearby windows and cold pipes.
- Weak or no airflow at the exterior cap while the dryer runs — especially right after a cleaning.
- A visible kink or flattened section in the flex duct behind the machine.
- The exterior flap hangs loose, is rusted shut, or is missing entirely.
Every one of these means exhaust is escaping before it reaches the outdoors, or cannot leave at all. That matters beyond laundry: moisture pushed into framing feeds mold, and lint blown into wall cavities stockpiles fine fuel next to a heat source. Cleaning a disconnected duct accomplishes nothing, because the problem is not what is in the pipe — it is the pipe.
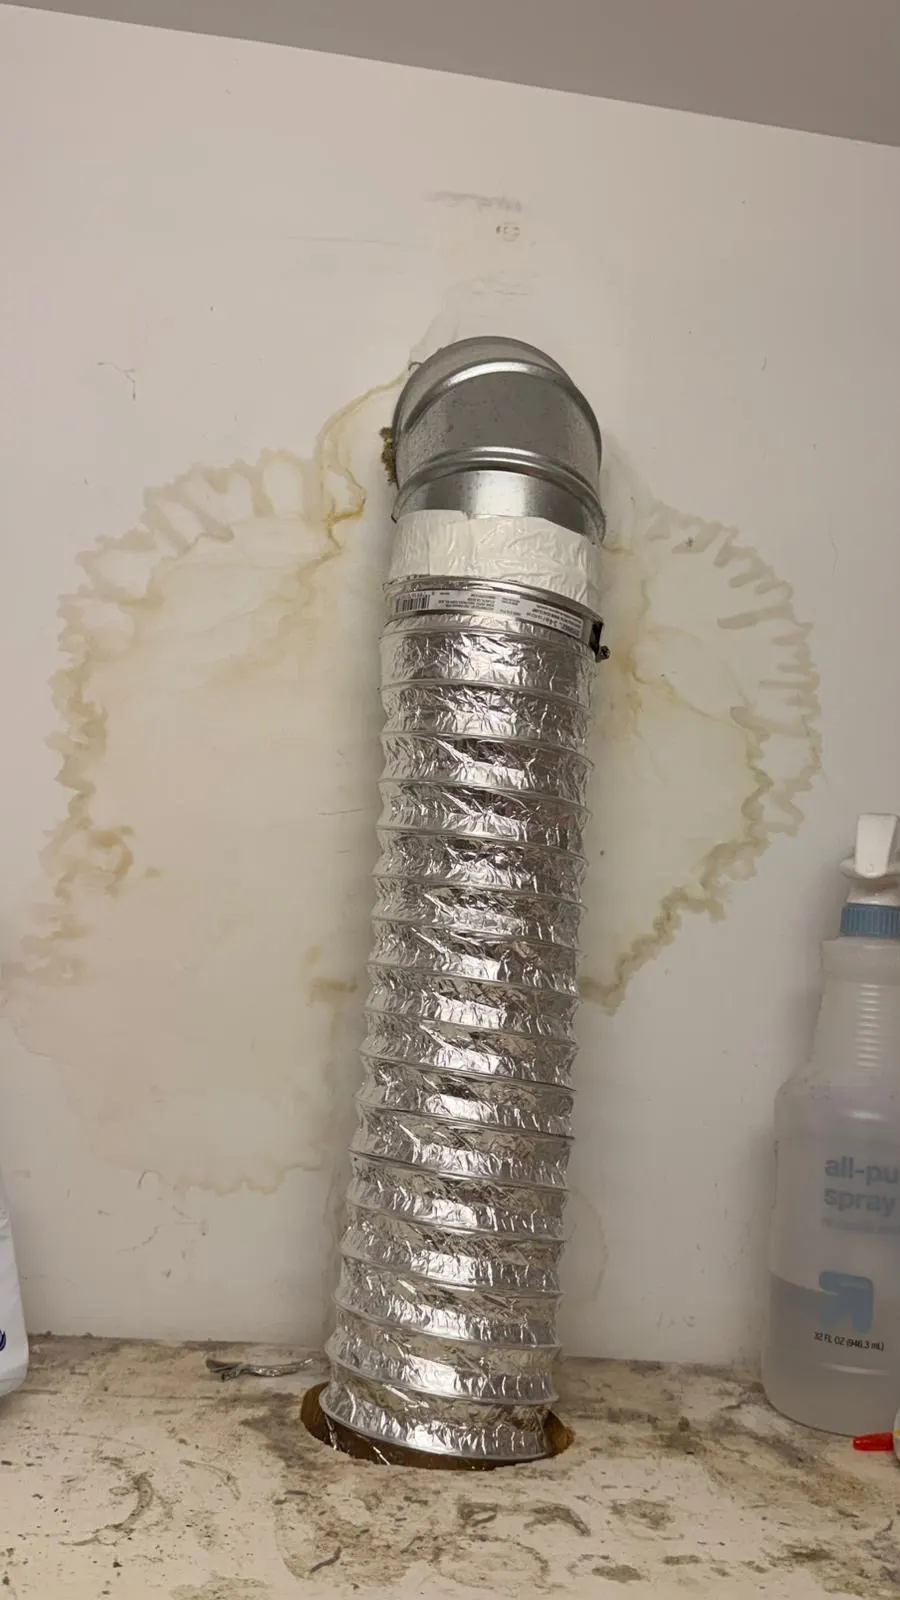
The most common casualty: the transition duct
The short flexible connector between the dryer and the wall takes more abuse than any other part of the exhaust run. It gets flattened every time the machine is pushed back against the wall, kinked whenever the dryer is dragged out, and — when it is a foil or vinyl product — it slowly tears along its ridges. A crushed transition can choke the entire system by itself, even when the concealed run behind it is spotless.
The stained, worn connector in this photo is typical of what we find behind dryers that have sat in place for years. Replacing it with a listed semi-rigid metal connector is one of the fastest, highest-value repairs in the whole system — usually done on the same visit as a cleaning.
What Materials Meet Code for a Dryer Vent?
Rigid, smooth-wall metal duct for the concealed run, plus a short listed metal transition duct behind the dryer — that is the code-friendly recipe. Residential codes based on the International Residential Code (section M1502) call for 4-inch smooth-interior metal duct, with joints fitted in the direction of airflow and sealed with foil tape or clamps rather than screws — a screw tip protruding into the airstream becomes a lint anchor. The transition behind the machine should be a single listed connector (look for a UL 2158A listing), kept short — codes commonly cap it at 8 feet — and never buried inside a wall, floor, or ceiling. Local amendments vary and your municipality has the final word, but these fundamentals hold across southeastern Pennsylvania.
| Material | Where it belongs | Verdict |
|---|---|---|
| Rigid galvanized steel or aluminum duct (smooth interior) | The full concealed run, from the laundry wall to the exterior termination | Code-friendly — the standard every run should be built to |
| Semi-rigid aluminum transition duct (UL 2158A-listed) | Behind the dryer only — short, exposed, single length | Code-friendly as a transition; never inside walls or floors |
| Foil "slinky" flex duct | Sold in every hardware store; belongs almost nowhere | Ridged interior traps lint, kinks and crushes easily — replace it |
| Vinyl or plastic flex duct | Nowhere on a clothes dryer | Not permitted — it can soften and burn; replace it immediately |
Foil flex deserves special mention because it is everywhere. The spiral-wire construction that makes it flexible also gives it a ribbed interior that catches lint on every ridge, and it flattens with a light push. If your run includes foil flex — and a large share of the homes we inspect do — upgrading it is not cosmetic. It removes the exact segment where most clogs are born.
Materials and maintenance are two sides of the same safety issue: the wrong duct collects lint faster, and collected lint is the leading fire factor. Our dryer vent fire safety guide covers the full prevention picture, including the warning signs that should stop you from running another load.
How Do You Decide Which Service You Need?
Match your symptom to its most likely cause — then verify with a camera rather than a guess.
| What you are seeing | Most likely culprit | The right fix |
|---|---|---|
| Dry times doubled gradually over months | Lint buildup in the run | Professional cleaning — flat written quote up front |
| Slow drying began right after the dryer was moved | Crushed or kinked transition duct | Replace the transition duct |
| Lint or moisture appearing indoors | Separated joint or disconnected duct | Repair, reconnect, and reseal the run |
| Little or no airflow at the cap after a recent cleaning | Disconnection or collapsed section | Repair — cleaning again will not help |
| Foil or vinyl flex anywhere in the run | Wrong material | Upgrade to rigid or listed semi-rigid metal |
| Exterior flap stuck, rusted, or missing | Failed termination | Replace the cap, then clean the line |
The honest answer is that you often cannot make the final call from the laundry room, because most of the run is hidden inside walls and framing. That is exactly why every E Cleaning job starts with a free video inspection: a camera goes into the line and you see the actual condition — buildup, kink, separation, or nest — before deciding anything. You can read how that works step by step on our process page. No guessing, and no paying for a cleaning when the duct actually needs a repair.
What Does Our Repair and Installation Service Cover?
Everything between the back of the dryer and the outside of the house. The bread-and-butter work: replacing crushed, torn, or worn transition ducts with listed semi-rigid metal connectors; reconnecting separated joints and securing them with clamps and foil tape; replacing crushed or corroded duct sections; and swapping broken exterior wall caps and flaps so the line seals against weather and pests. The bigger jobs: upgrading foil or vinyl flex runs to rigid metal, and correcting runs that terminate in the wrong place — an attic, crawlspace, or garage — so the exhaust actually leaves the building, as code requires. We also handle full new installations when a laundry room moves or a home never had a proper vent run at all.
Every repair ends the same way a cleaning does: with proof. You see airflow at the termination with the dryer running, and you get after-photos of the finished work. E Cleaning is a PA-licensed contractor (PA 187935), insured up to $2 million, and Google Guaranteed with money-back protection up to $2,000 on qualifying jobs — the same crew that cleans your line can rebuild it, in most cases on the same visit.
What Does Each Option Cost?
Whichever way the camera points, the answer arrives the same way: the video inspection is free, and you get a flat, written quote before any work begins. Routine cleaning and deep cleaning are honestly scoped as the different services they are — clearing ordinary lint from a sound line is not the same job as extracting a nest or years of compaction — so your quote reflects the work actually in front of us, not a one-size number. There are no trip fees anywhere in our service area, and the figure you approve is the figure on the invoice: no surprise line items, no door-step upsell. Our dryer vent cleaning cost guide breaks down what the market charges and exactly what a fair quote should include.
Repairs especially benefit from this approach: a quick transition swap and a full re-route through finished framing are not the same job, and pricing them the same over the phone would be guessing. You see the camera footage, you get the exact scope and price in writing, and you approve it before any work starts — the same anti-bait-and-switch standard we hold on cleaning. Financing through Wisetack is available if a larger repair lands at a bad time.
What Should You Do Next?
Start with the two-minute check you can do today. Pull the dryer forward and look at the transition duct — kinks, crush marks, tears, or foil construction all mean it should be replaced. Then run the dryer and watch the exterior flap: strong, steady air and a freely swinging flap point to a healthy line; weak air points to a clog; no air, or exhaust you can smell indoors, points to damage. Whatever you find, resist the urge to push a brush kit deep into the run — our guide to what can go wrong with DIY dryer vent cleaning explains how good intentions compact clogs and separate joints. We serve Montgomery, Chester, Bucks, Delaware, Berks, and Philadelphia counties from King of Prussia, around the clock, Sunday through Friday — we're closed Saturdays.
